Showing posts with label Blue Ribbon Quilt Pattern. Show all posts

Tuesday, August 23, 2016

Vintage Patterns: Circus Elephants and Flowers

Blue Ribbon Patterns p-130 includes 23 quilt patterns. The pamphlet was published in 1974, based on patterns that appeared in previous Tower Press pulications.


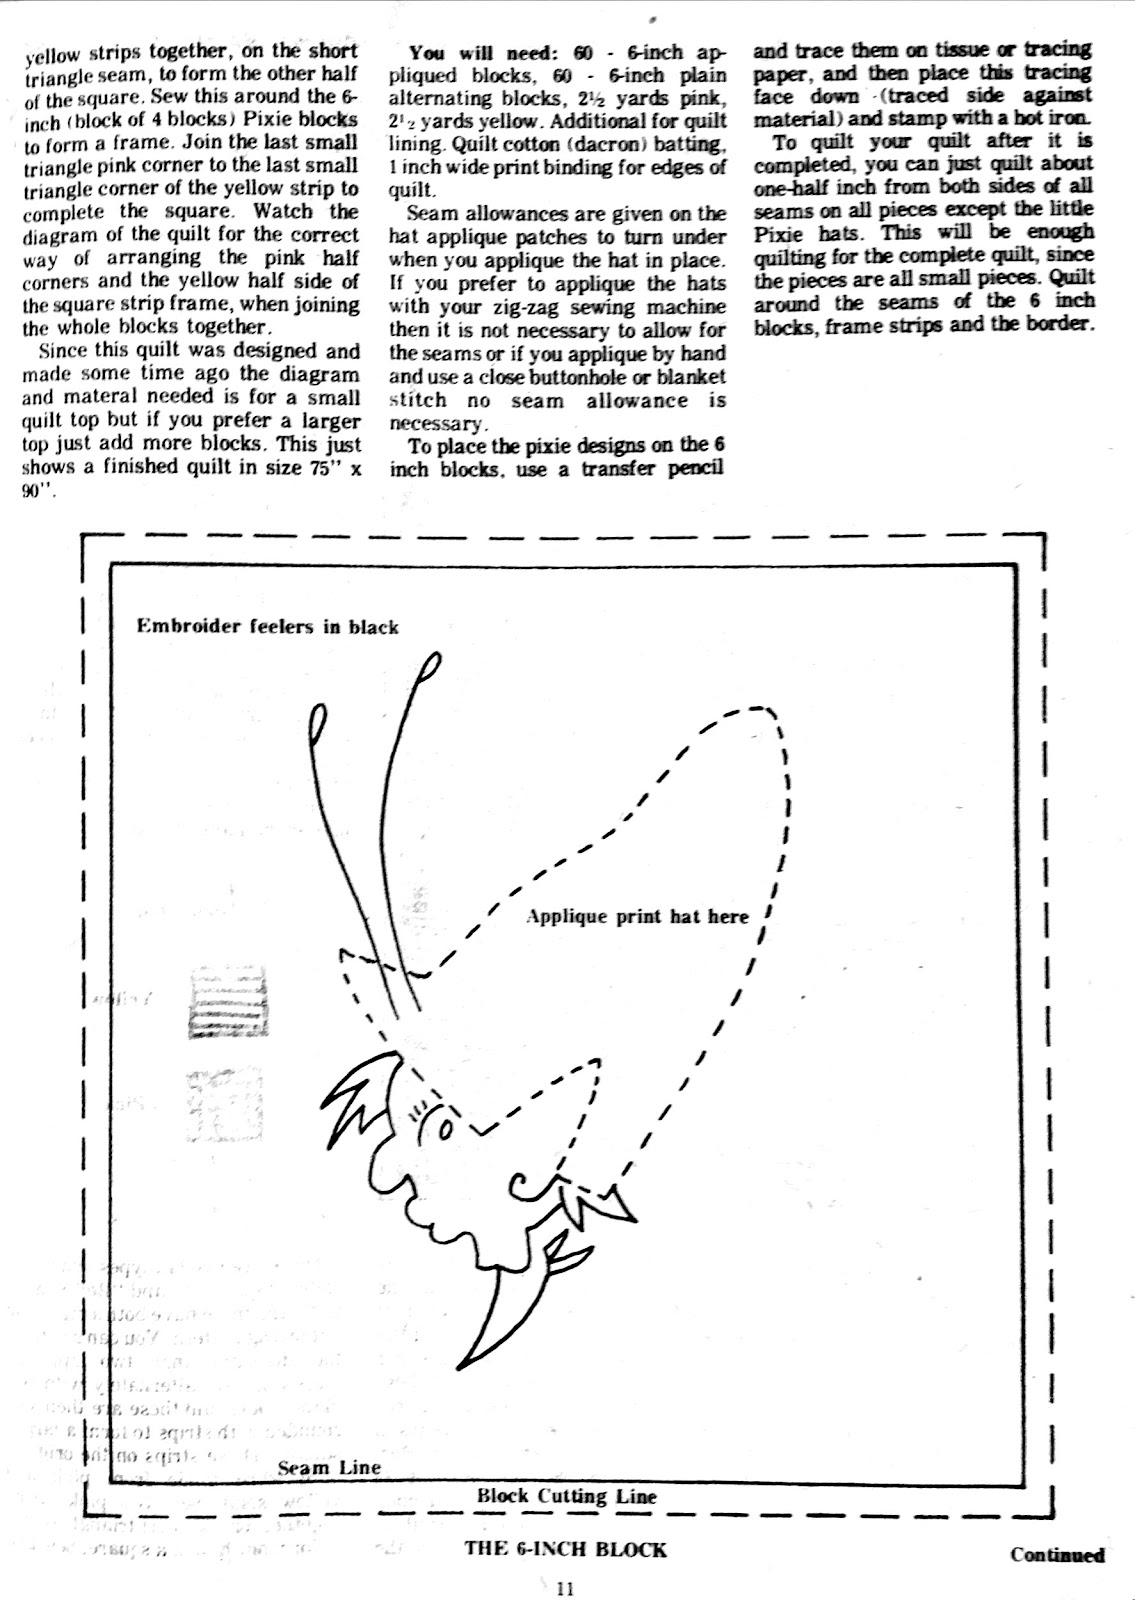
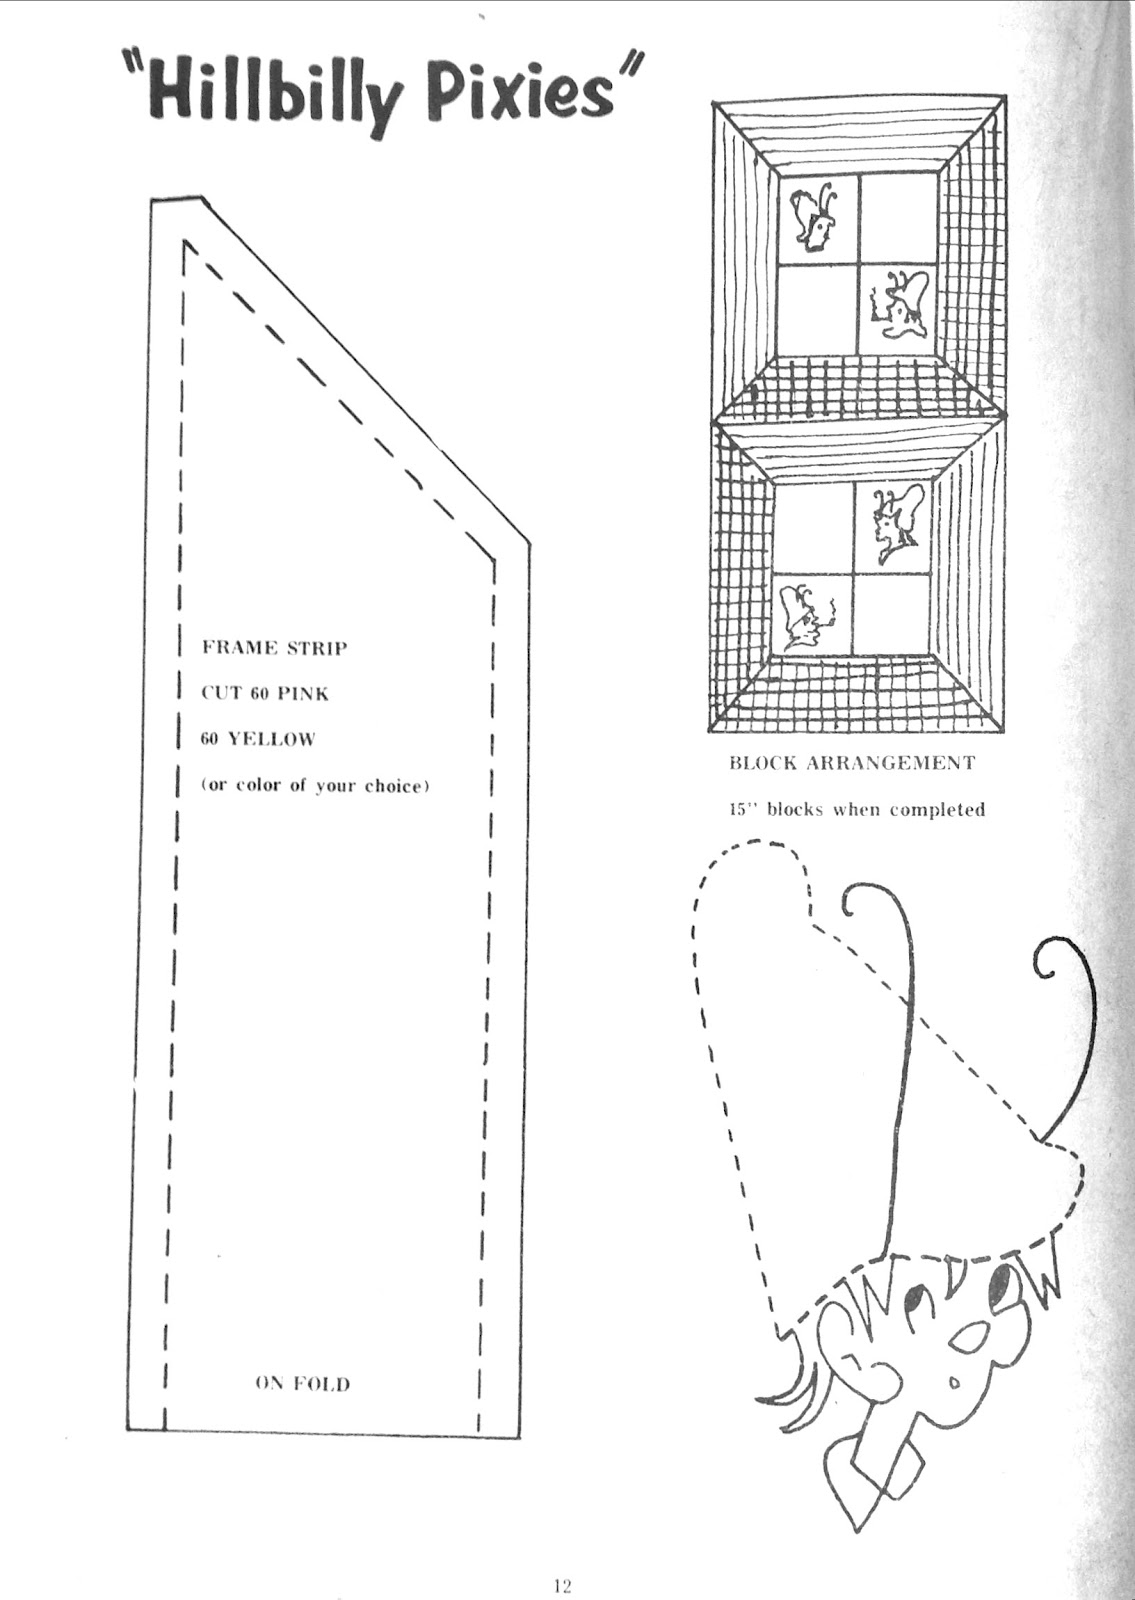
The Circus Quilt contributed by Betty Nordwall has an adorable elephant border. Once elephants were associated with circuses; thankfully these intelligent creatures are being phased out of such servitude.
Circus parade coming into town, 1930s-early 1940s. Family photo.
"Finished quilt is 35" by 57". It is made of 11" blocks. It requires 1 2/3 yards of white or plain light colored fabric for the top, 1 yard gay stripe, 1 2/3 yards backing, 1 2/3 yards flannel for the middle layer.

"Cut 12 blocks 12"x12" of plain fabric (1/2" seam allowance). Cut a strip 12"x35" of the same fabric. Cut 12 elephants from various print scraps you have. Cut 24 ears and 12 blankets from various plain fabrics.

"Trim blankets with 2 rows of metallic rick-rack and applique on elephants.  Applique elephants on blocks, putting 8 on straight and 4 on diagonal for the corners. Chain sttich head decorations with 6 strand embroidery thread. Embroider star medallion.

"Sew ears together in pairs, leaving open bottoms; turn, and tuck in ear as indicated by arrow and sew in place at bottom and 1/2" up each side only, leaving ears to flop.

"For tents, cut two blocks 9" by 7" (allow 1/4" seams) from the stripe on the diagonal. Applique on center stip, rounding bottom and top curves slightly.

"To make a 1" deep scallop, cut two strips of plain material 1 1/2" x 9" on bias. Sew with right sides together along sides and bottom in a scalloping manner. Attach to tent along top only. Cut a triangle 9" along the base and 6" high on the diaonal stripe. Applique on tent top, curving all sides as needed. Embroider markings and flag staff. Add colorful flag, 2" x 1 1/4" (allowing for 1/4" seam).

"Sew blocks together and make washable yarn (cotton, nylon, or orlon) tails. Cut 3 strands of yarn 9" long, tie in center, fold and braid. Tie end and trim. Tack in place and also on next elephant's trunk. The tail on corer may not reach.

"Baste quilt top to backing and flannel middle layer. For the edging, but 4 yards of 3" stripe on biased, fold in half and iron down. Sew around with 1/2" seam. Quilt or tack as desired."

The Pansy Quilt applique pattern was submitted by Gertrude Riden, Rt. 3, Box 222, Rollin, Missouri. Instructions read, "Here is the pattern. Use your own color combinations. This quilt takes 32, 10 inch appliqued bloks. It is set together with 10 inch solid color blocks."

Hand appliqued, crayon and pen enchanced. by Nancy Bekofske

Next is Old Fashioned Rose, a pieced pattern submitted by Mrs. Rosa Anna Ratlff. "This bautiful quilt is rarely shown today ut if there should be any qult "addicts" among you who may want to tackle this pattern these are the instructions.

Quilt size- 82x108
No. of Blocks - 20
4 blocks wide and 5 blocks long

P-pink R-rose   LtG- light green   Dk. G-dark green  B-brown

Actual size with sean allowance chart for blocks
Four blocks assembled
Increase blcoks to 1 1/2"

Materials needed:
2 1/2 yds dark green
1 3/4 light green
1/3 dark brown
3/4 yd rose
2 1/4 yd pink
1/4 yard pink or green for square between blocks
7 yds white for blocks and strips

"This quilt is made up of 1 1/2 inch squares and at least a 1/4 inch seam allowance. However I suppose it could be made larger easier enough by the yardage would have to be re-estimated. Anyone with a rule and a block of the quilt could draft it!"

Last of all is the Rose Cross Quilt. Only the applique patterns were included.

I already shared the Bird of Friendship pattern from this issue; find it here.

Wednesday, June 22, 2016

Bird of Friendship Appliqué Pattern

Here is a sweet block from Blue Ribbon Patterns p-130, published in 1974 by Tower Press.


Bird of Friendship Quilt

This quilt is a original idea of Lauraine Smith. Since so many of you ladies are interested in friendship quilts, I'm sure this pattern will make a unique and different quilt and a fine keepsake.

This quilt takes 14 blocks, each block measuring 12 inches square, plus a seven inch border at the top and sides and a 14 inch border at the bottom.

Materials needed are: yellow for the blocks, blue for the birds, white for the envelopes, and pink for the border.

Baste and stitch bird and envelope on each of the yellow squares. Use a ball point pen to mark features, seams, etc. of it you wish they may be embroidered.  Make patterns from drawings and allow for seams.

Lauraine M. Smith, 21 Withee Avenue, Madison, Maine 04950

Researching Lauraine M. Smith on ancestry.com shows she was born in 1915 and died April 9, 2000. I found her pattern also appeared in the July, 1968 Stitch/Sew magazine  I did not discover anything more about her.


Thursday, June 9, 2016

Hillbilly Pixies Quilt Pattern

Years ago I saw a quilt on eBay with appliquéd and embroidered elves. Some time after that I found the pattern in Blue Ribbon Quilt Patterns by Ruby Hinson published in 1973.
the eBay quilt
Here is the pattern.

"For the next two issues I am going to give you one of the cutest and most unusual crib or youth quilt patterns that I have ever seen. This pattern was designed almost forty years ago but has never been published before. The pattern was sent to me by the present owner of the original quilt, Mrs. Evelyn Bernard, an aunt of the designer. The following is taken from the pattern as it was sent to me:
"This quilt was started in 1933-34 by Virginia B. Howe, who is the niece of Evelyn Bernard, who is the owner of the quilt. Miss Howe drew the little pixies free hand, so these are her own originals. There were 34 of these little 6-inch blocks made up at that time. They were kept for 32 years in a protected place by Evelyn Bernard, and in 1966 she sent the 34 made up blocks to a pen pal, Winona Clocker, with enough material to make the other blocks and finish the quilt for her. The quilt diagram shown is the original setting for this long loved quilt. The quilt arrangement of Winona's made the little 6-inch blocks seem larger and if you look closely the little pixies will run in a circle.

"All hats are appliquéd of different prints, no two alike. Embodier the scarves, ties, and collars in a color picked from the print hat. All faces are embroidered in black outline stitch. Hair may be any color desired, such as yellow, red, brown, black, white, gray or tan. 

"There are two hat types which are called "Split Hat" and "Bell Shaped Hat" and thee have both a right and left facing pattern. You can see from the diagram that two appliqué blocks are set alternately with two plain blocks and these are then surrounded with strips to form a larger square. These strips on the original quilt were made from pink and yellow solid. Sew two pink strips together, on the short triangle seam, to form one half of a square. Sew two yellow strips together, on the short triangle seam, for form the other half of the square. Sew this around the 6-inch block to form a frame. Join the last small triangle corner of the yellow strip to complete the square. Watch the diagram of the quilt for the correct way of arranging the pink half corners and the yellow half side of the square strip frame, when joining the whole blocks together.

"Since this quilt was designed and made some time ago the diagram and material needed is for a small quilt top but if you prefer a larger top just add more blocks. This just shows a finished quilt in size 75" x 90".

"You will need: 60 each 6-inch appliquéd blocks; 2 1/2 yards pink, 2 1/2 yards yellow. Additional for quilt lining. Quilt cotton (dacron) batting, 1-inch wide print binding for the edges of the quilt.

"Seam allowances are given on the hat appliqué patches to turn under when you appliqué the hat in place. If you prefer to appliqué the hats with your zig-zag machine then it is not necessary to allow for seams or if you appliqué by hand and use a close buttonhole or blanket stitch no seam allowance is necessary.

"To place the pixie designs on the 6-inch blocks, use a transfer pencil and trace them on tissue or tracing paper and then place this tracing face down (traced side against material) and stamp with a hot iron. To quilt your quilt after it is completed, you can just quilt about one-half inch from both sides of all seams on all pieces except the little Pixie hats. This will be enough quilting for the complete quilt, since the pieces are all small pieces. Quilt around the seams of the 6-inch blocks, frame strips and the border."


Blue Ribbon Patterns p-640 Vol. 1; Quilt Patterns by Ruby Hinson. Tower Press publications.